Only one schedule is permitted per project. If you are creating a schedule for a project, you will see the Create Schedule page where you can complete the details of the schedule, which is a preliminary step before adding tasks. Setting up schedule details means defining the days that make up the work week, the start date of the project, number of hours per work day and choosing the schedule manager role and user. From here, you will also determine whether or not an external scheduler will be used conjointly with the e-Builder Schedule module.
- On the top navigation tabs, click the Schedule tab.
- Click the Project drop-down menu and select the project name. The Schedule page is displayed.
Contains a list view of tasks by row and of fields by columns. Field availability is based on module attributes for the account, and edit capabilities are based on user roles. Changes made to the Tasks pane are saved for the user per project.
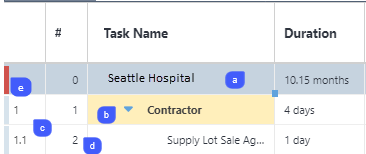
- Project summary: Displays a total of the tasks duration. It also reflects the earliest start date and latest end date for all the tasks in the schedule.
- Task Summary: The blue arrow indicates there are tasks grouped under this task. Click to show all the tasks under the task.
- Work Breakdown Structure (WBS) number: Represents the task’s relative place in the schedule hierarchy.
- #: Represents the task number. This is the number referenced in the Predecessor and Successor columns. This column does not appear by default and will need to be manually added to the Tasks pane.
- Status indicator: Each color indicates the status of the task.
- Blue = Complete
- Red = late
- Yellow = early
- Orange = no baseline
- Green = on time
On the Tasks pane, you can:
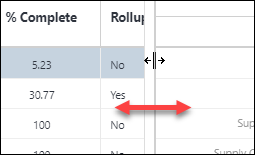
- Resize pane: Drag the splitter line between the Task pane and the Gantt chart left or right to change the visible space in each area.
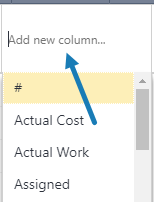
- Add a column: Click Add New Column and select a column name from the dropdown list.
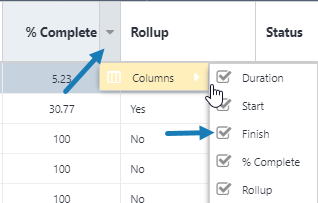
- Remove a column: Click on the column header down arrow and uncheck the column name.
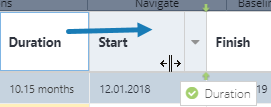
- Move a column: Click on the column header and drag to the desired location. A green check mark appears when you are dragging the column to an acceptable location.
Contains a graphical time-scaled view of task durations and relationships.
On the Gantt chart, tasks are represented by the following graphical components:
- Summary task: Green bar

- Task: Blue bar

- Task Baseline: Gray bar
- Milestone (zero duration): Green diamond

- Relationships: Blue arrows

- Critical Path: Tasks and arrows highlighted in red

The gray toolbar that contains buttons for navigation and actions. Depending on your user roles, the following buttons are available:
- Add Task: This button is not visible to Task Resources. Only Schedule Managers and Task Managers are able to see this button. Click to add a single task.
- Outdent: Decreases the indentation level of the selected task in the tree. This button is only available to Schedule Managers or users with Manage Templates permission. For instructions, see Move Tasks within the Schedule.
- Indent: Increases the indentation level of the selected task in the tree. This button is only available to Schedule Managers or users with Manage Templates permission.
-
Undo: Click to undo the last action. This button is only available to Schedule Managers or users with Manage Templates permission.
- Redo: Click to undo the last action. This button is only available to Schedule Managers or users with Manage Templates permission.
- Import: Click to import tasks using an .MPP file (Microsoft Project 2003, 2007, 2010, 2013). This button is only available to Schedule Managers or users with Manage Templates permission. For details or instructions, see Working with Schedule Imports.
- Expand: Shows all the tasks and subtasks.
- Collapse: Collapses the subtasks under their tasks.
- Previous / Next: Moves the time axis backward / forward in time in units specified by the current view.
- Zoom In/Out/Fit: Click to zoom in or out the timeline. Click Fit to change the timeframe of the scheduling chart to fit all the events in it.
- Working Time: Click to open the Manage Calendars dialog box. If your account has the Resource Management (RM) or Resource Management with Costs (RMC) option enabled, you have the ability to manage calendars.
- Templates > Apply Template: Select the schedule template that has been created by your e-Builder account administrator or someone with manage templates permissions. Templates give schedule managers a basis for starting the project schedule. This button is only available to Schedule Managers or users with Manage Templates permission. For instructions, see Manage Templates.
- Templates > Save as Template: Click to save the current schedule as a personal template or as an account template to be used throughout the account. This button is only available to Schedule Managers or users with Manage Templates permission. For instructions, see Manage Templates.
- Critical Path: Click to highlight in red the critical paths that can affect the end date of the project.
- Export: Click to export e-Builder schedule as a PDF or as an .XML file, which can then be uploaded to Microsoft Project. This button is only available to Schedule Managers or users with Manage Templates permission. As a Schedule Manager, if you use Microsoft Project conjointly with e-Builder as your scheduling tool, through the import and export options, you can work seamlessly with both utilities. For instructions, see Export Schedules.
- Send: Click to send the schedule or the selected tasks to users in the project or external users using their email address. The Send Schedule dialog also allows you to send a message to the recipients.
- Snapshot: Click to save a snapshot of the schedule. A snapshot can be taken at any time. Ideally, you should save a baseline before the project gets underway to give you a basis for comparing your progress. In most cases, after the baseline is saved, a snapshot if taken on a monthly basis. Saving a Schedule Snapshot will keep a "picture" in e-Builder of where a Schedule was as the time the snapshot was taken. Snapshots can then be compared to the baseline or later snapshots for progress analysis. To see all the snapshots that have been taken, click the Snapshot tab toward the bottom of this page. This button is only available to Schedule Managers or users with Manage Templates permission. For instructions, see Schedule Snapshots.
- Set: Click to save a baseline of your schedule. For instructions, see Manage Schedule Baseline.
- Toggle: Click to show or hide the baseline.
- Task Name: Displays the name of the task
- Duration: Task duration in days (Note: for parent tasks, the units automatically changes to Weeks for Duration >20 days, and changes to Months, for Durations >26 Weeks)
- Predecessors: The tasks that precedes the task (Options are FS, SS, FF, SF)
- Successors: The tasks that succeeds the task (Options are FS, SS, FF, SF)
- Start: The planned start date for a task.
- Finish: The planned finish date for a task.
- % Complete: The manually updated progress, as a percentage of duration, on a task (may also be automatically calculated as of the current date, if the schedule setting is enabled to "Automatically calculate the % complete").
- Early Start: The earliest date that a task can start based on any dependencies and constraints.
- Early Finish: The earliest date that a task can finish based on the Early Start date plus Duration, as well as any dependencies and constraints.
- Late Start: The latest date that a task can start in order to meet any successor Milestones (such as a Project Finish No Later Than Constraint on a Project Finish milestone)
- Late Finish: The latest date that a task must finish in order to meet any successor milestones (such as a Finish No Later Than Constraint on a Project Finish milestone).
- Baseline Duration: The duration in days on each selected task at the moment that the baseline was last set.
- Baseline Start Date: The start date on each selected task at the moment that the baseline was last set.
- Baseline Finish Date: The finish date on each selected task at the moment that the baseline was last set.
- Baseline % Complete: The manually updated progress, as a percentage of duration, on each selected task at the moment that the baseline was last set.
- Calendar: Select from the available project calendars.
- Constraint: Select the type of constraint to be applied to a task (Options are: None, As late as possible, As soon as possible, Finish no earlier than, Finish no later than, Must finish on, Must start on, Start no earlier than, Start no later than)
- Constraint Date: Select the date that is desired to coincide with the constraint type. To remove a constraint, you must first change the Constraint Type to "None".
- Critical: Indicates that a task is on the critical path (longest path) for the project schedule.
- Start Variance: Start Variance = Start - Baseline Start Date
- Finish Variance: Finish Variance = Finish - Baseline Finish Date
- Free Slack: The number of days that a task can fall behind schedule without affecting the start date of its earliest successor task.
- Total Slack: The number of days that a task can fall behind schedule without affecting the project completion's late finish date.
- Master Process: When configured on the account, select the Master Process number that you wish to associate with a task.
- Status: The status of a task compared to its Baseline Finish Date (Statuses are: Draft, Not Baselines, On Time, Early, Late, Complete)
- Manual mode: When enabled, it allows users to change a task's dates manually and ignore schedule dependencies. To enable it, click on the cell and select the check box.
- Master Task: When configured on the account, select the Master Task that you wish to associate with a task.
- Milestone: Indicates whether the task is a zero duration milestone.
- Rollup: Indicates all parent tasks (Values are Yes, No)
Values are either: N days Late, N d Early, or 0d (Example: 2d Early, 3d Late)
Values are either: N days Late, N days Early, or 0d (Example: 2d Early, 3d Late)
Based on which schedule modules that have been enabled on your account, the following columns may be available:
- Assigned Resources: Select a resource from the resource pool on the account. From the Assigned Resource column, you may also select the role from the available Resource Roles on the account, and adjust the units, which is the desired % of an assigned resource's work day.
- Mode: The scheduling mode which dictates how e-Builder will calculate either the task's Duration, Work, or Units. For more information, see Schedule Mode.
- Calendar: Select one of the calendars for the selected task.
- Budget Line Item: The Account Code selected for Resource Cost
- Work: The total resource hours on a task.
- Baseline Work: Total resource hours on a task at the moment that the last baseline was last set.
- Planned Work: Resource hours on a Task that are linked to Budget Line Items.
- Actual Work: Work x % Complete
- Remaining Work: Work – Actual Work
- Cost – Total Resource Cost: Each Assigned Resource's Work x their corresponding (Rate + Burden)
- Baseline Cost: Total Resource Cost on a task at the moment that the last baseline was last set.
- Planned Cost: Total Resource Cost on a task that are linked to budget items.
- Actual Cost: Cost x % Complete
- Remaining Cost: Cost – Actual Cost
- Estimated Work at Completion: Sums the greater of Planned Work or Actual Invoice Work for every assigned resource.
- Approved Invoice Work: Resource Hours from Approved or Paid Invoices
- Remaining Invoice Work: Estimated Work at Completion – Approved Invoice Work
- Estimated Cost at Completion: Sums the greater of Planned Cost or Actual Invoice Cost for every assigned resource.
- Approved Invoice Cost: Resource cost from Approved or Paid Invoices
- Remaining Invoice Cost: Estimated Cost at Completion – Approved Invoice Cost
- Work Variance: Work – Baseline Work
- Cost Variance: Cost – Baseline Cost +Over,-Under
- Manager Role: Select the role that the schedule manager belongs to from roles that have "View Cost" permissions. Doing so will enable the subsequent drop-down menu, which allows you to choose the appropriate user in this role. Users in the designated Schedule Manager role can create the schedule and tasks, edit schedule details, create and apply templates, and update tasks. These permissions are not limited to only the individual named in the Schedule Manager User field.
- Manager User: This menu is enabled only after a role is selected from the preceding Manager Role drop-down menu. Click the drop-down arrow to assign the manager user. This field is intended as a reference to the primary project contact for the schedule. Any user in the project having the same role as the “Manager Role” will be able to edit the schedule and manage resources on the schedule.
- Use External Scheduler: Select whether or not an external scheduler will be used.
- Automatically calculate the % complete: When selected, e-Builder calculates the % complete on a pro-rated basis for any task with a Start Date and/or Finish Date in the past (before the current date). If the Task Finish Date is in the past, the Task is updated to 100% complete.
- Link Resource Cost to the Budget: This option is available only when 'Resource Management with Cost' has been enabled on the account.
This feature should be turned on only if another scheduling software, such as Primavera 6, is your primary scheduling tool and e-Builder will only be used to make scheduling information available to internal staff, or if the schedule is being pulled into Cash Flow projections. If set to Yes , all action buttons will be disabled in the e-Builder Schedule module and you will only be able to import and export tasks in an Excel spreadsheet. This setting also makes it possible to update multiple project schedules in a single import. This can be disabled at anytime.
For information and instruction on working with another scheduling tool, see Enable External Scheduler.
None: Default setting - This setting is disabled.
Tasks to Budget Line Item: Allows Schedule Manager to select a single Budget Line Item for Resource Costs on a Task.
Choose this option for projects where all the resources who are assigned to a single task charge their time to the same budget line item or account code.
Resources to Budget Line Item: Allows the schedule manager to select a single budget line item per resource assigned to any task. Can result in multiple budget line items for resource costs on a task if resources are linked to different budget line items.
Choose this option for projects where different resources working on the same task can charge time to different budget line items or account codes.
- Start Date: Click the calendar icon to choose a project start date. You can also use free-text entry in mm/dd/yyyy format.
- Hours per day: Enter the number of hours that will make up the work day. By default, the work week is Monday - Friday, 8 hours per day, and 40 hours per week.
- Hours per week: Enter the number of hours that will make up the work week. By default, the work week is Monday - Friday, 8 hours per day, and 40 hours per week.
- Days per month: Enter the number of working days per month. By default, the work week is Monday - Friday, 8 hours per day, and 40 hours per week.
- Calendar: Only available to MC, RM and RMC account attributes. Select one of the calendars or click Manage Calendar to create another one.
- Manage Calendar: Only available to MC, RM and RMC account attributes. Use the Manage Calendars dialog box to edit or create a new calendar. From here you can set the working days and hours, as well as set the exceptions (e.g., holidays).
If Saturday and Sunday are added to the work week, increase the hours per week to 56 and days per month to 30. Otherwise, task durations will automatically adjust to the days and hours per week entered.
If Saturday and Sunday are added to the work week, increase the hours per week to 56 and days per month to 30. Otherwise, task durations will automatically adjust to the days and hours per week entered.
If applicable, this tab lists the schedule custom fields. Custom field values can be modified by editing schedule details.
Lists all saved snapshots and gives you the ability to compare multiple snapshots to one another. To save and compare snapshots, see Manage Schedule Snapshots
Provides a history of the activities and actions taken in the Schedule module. This tab is a great resource for the auditing process.