Manage Membership
- From the top navigation tabs, click the Setup tab or from the Utility menu by clicking the drop-down arrow next to your user name.
- In the Administration Tools section, click Users.
- Click Manage Users.
- Optional: User the filter to search for the user.
- Click the name of the user.
- Click Manage Membership.
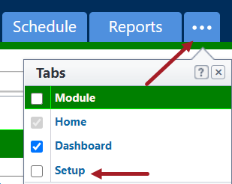
If the Setup tab is not visible, click ![]() , and then select the Setup check box.
, and then select the Setup check box.

The 'All Projects' column contains a list of projects that are available to the user.
- Go to the Manage Membership page.
- On the Projects tab, from the All Projects box, select the projects you want to grant the user access to and click the right-directional arrow to add the project to the Projects That User Is A Member Of column.
- Select the Notify user added/removed to/from project(s) check box.
- Select the Include login info check box.
- Click Save.
- Go to the Manage Membership page.
- On the Projects tab, from the All Projects box, select the projects to which you want to assign the user as an administrator and click the right arrow to add the project to the Projects That User Is A Member Of column.
- Ensure that project is still selected and click the right arrow to add the project to the Projects that the User is An Admin Of column.
- Select the Notify user added/removed to/from project(s) check box.
- Select the Include login info check box.
- Click Save.
- Go to the Manage Membership page.
- From the Projects That User Is a Member Of column, select the project that you want to remove the user from.
- Click the left arrow to add the role to the All Projects column.
This tab allows you to manage the user's account role membership.
- Go to the Manage Membership page.
- Click on the Account Roles tab.
- From the All Roles column, select the role to which you wish to assign the user.
- Click the right arrow to add the role to the Roles That User Is a Member Of column.
If a user is in an account role, they will not be able to have exclusive project level permissions. To maintain project level role permissions, the user must be removed from the account role. To learn more, see About Project Level Roles.
- Go to the Manage Membership page.
- From the Roles That User Is a Member Of column, select the role that you want to remove from the user.
- Click the left arrow to add the role to the All Roles column.
The Project Roles tab allows you to select a project role and project to make this user a member of. Project level permissions allows you to diversify the permission of a role from project to project. To learn more, see About Project Level Roles.
The Role Templates tab allows you to add the user to a role template and choose a particular project to apply the role template to.
This tab appears only if you have Time Tracking enabled with Cost Integration. Bill rates are required to calculate billable activities. If not established, users will not be able to submit time sheets for billable tasks. Bill rates can also be managed at the project level by users with Manage Project Bill Rates permissions. To learn more, see About Managing Time Tracking and Manage Account Bill Rates.
The following fields are available on this tab:
Hourly Default Bill Rate: You can set a default hourly rate that will be applied as the user's bill rate for all projects they're associated with. However, you can still specify rates for various projects in the Bill Rates table below. In addition, users with Manage Project Bill Rates permissions can modify bill rates at the project level. Changes made on either page (account or project) will synchronize.
Project: Lists all the projects that the user has access to.
Billable: Select the check box next to the project for which the user is billable. If the check box is not selected the user will not be able to choose billable activities for that particular project when completing their time sheets - only non-billable tasks will be viewable to them in this case.
Default Bill Rate: Select the check box next to the project for which the default bill rate should be used.
Bill Rate Per Hour: This column displays the hourly bill rate. The default rate appears, if this check box was selected. If the default check box was left empty, this is an editable field for you to enter a specific amount.