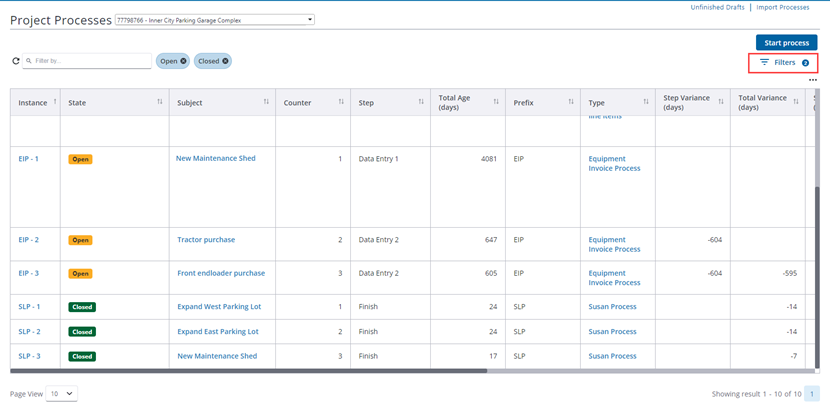
From the Processes For {project} page, you can start a process, search for process instances, access active processes in order to take further action, or view detailed information.
Project Processes
- Unfinished Drafts: See and take action on draft forms and processes
- Processes for: Click this drop-down arrow to access processes for different projects. This menu gives you a quick and easy way to switch between projects.
Use filters to narrow your search results to just the process types that you need. For more information, see Process Instance Search.
e-Builder automatically saves the filters and grid display options that were last used and displays them the next time you come back to the Project Processes page.
Project Processes Page - Filter Processes drop-down, Filters button, and Chip Filters
The following fields and buttons are available on the Project Processes page:
- Refresh results
 : When this button is clicked, the results for the selected filters are refreshed.
 - Filter Processes: Select one of the following options from the drop-down list to narrow down the process instances search results.
- Subject: Select this option to search for the specified criteria in the subject field of process instances.
- Instance: Select this option to search for the specified criteria in the process instance.
- Data Fields: Select this option to search for the specified criteria in process data fields.
- Comments: Select this option to search for the specified criteria in the comments on a process instance.
- Custom Fields: Select this option to search for the specified criteria in custom fields on a Cost process instance. This option will be available only when you select a Cost process in the Filters panel beforehand.
- Filter by: Enter text in the Filter by field to filter records and return results containing the specified search keyword criteria.
- Filters: Click the Filters button to open the panel. Within the Filters panel, click X to close it. To reset all the filter selections back to the default, click the Reset button in the Filters panel.
Each filter that you select from this panel is displayed as a chip on the Project Processes page. Only one option button can be selected at a time but one or more check boxes can be selected at one time, if needed. The number of filters that are currently applied are displayed as a number on the Filters button.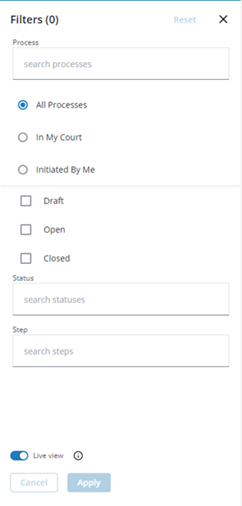
Filters Panel with Live View Enabled
The following fields are available in the Filters panel:
- Process: Enter or select a specific process type to filter records by. The type of process selected in this field determines the buttons that display on the page and the statuses or steps available.
- All Processes: Select this option to filter by all processes including processes in your court, processes you initiated and all processes.
- In My Court: Select this option to filter by processes in your court.
- Initiated By Me: Select this option to filter by processes you initiated.
- Draft: Select this check box to filter for draft processes.
- Open: Select this check box to filter for open processes.
- Closed: Select this check box to filter for processes that have been closed.
- Status: Enter or select a specific process status to search for and filter records by. If no Process Type is selected, then the Status list will display all Process Status Options from the process setup. Once a specific Process Type is selected, then the list is narrowed to the account defaults and the statuses included in the process design.
- Step: Enter or select a specific process step to search for and filter records by. Note that you will be able to select a step only after selecting a specific process type.
- Live view: Enable this toggle to immediately retrieve data as filters are changed in the Filters panel. When the Live View has been turned off, the Cancel and Apply buttons at the bottom of the Filters panel will be available to use. You will then need to select multiple filters and then manually apply them by clicking Apply to retrieve the results.
When using the Filters panel to narrow down a specific type of process on the Project Processes page, check boxes will be shown on the left of each process instance in the results. To select a long range of check boxes (multiple selection), click the first process instance check box for the range, press and hold the Shift key on the keyboard and then click the last process instance check box of the range.
- Start New Process Instances: Use either of the following methods to start a new process instance:
- Start a process: To start a new process instance, click the Start Process button. In the Select Process Window that is displayed, enter search criteria in the search box, select a process and then click Start.
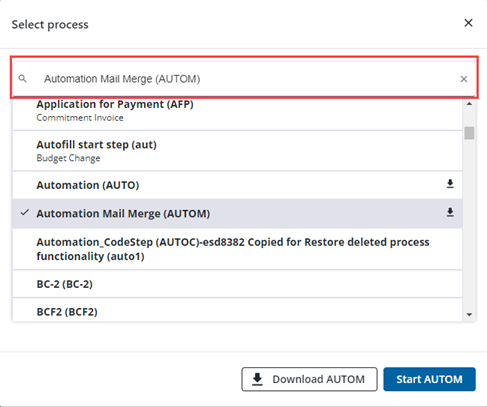
Search box in the Select Process Window
- Start a selected process: When a process type is selected from the Filters panel, the Start <selected process> button will be available on the Project Process page.
- Start a process: To start a new process instance, click the Start Process button. In the Select Process Window that is displayed, enter search criteria in the search box, select a process and then click Start.
- Select display columns: Click the
 icon to access a list of available columns and then select which columns to display in the grid by selecting or clearing the check boxes.
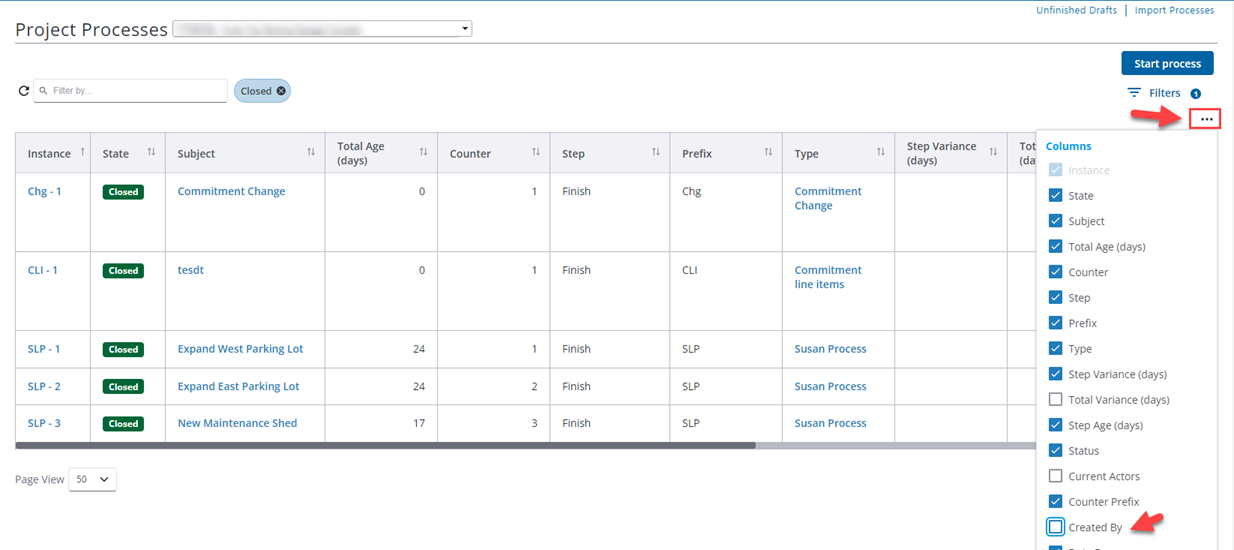
Project Processes Page - Select Display Columns
- Grid: You can perform the following grid display actions on this page:
- Sort: Sort the rows by clicking on the header text or on the sorting arrow icons in any column header.
- Resize Column Width: Click and drag the borders of any column header to re-size the column.
- Reorder Columns: Click and drag column headers to change the order of the columns.
- Page View: Select the number of rows to display per page from the Page View drop-down list.
- Navigate through Pages: When multiple pages of results are available, you will be able to click a page number to move to it.
You can change the Display Density settings to adjust the amount of white space that appears between each row in the grid on this page. (Setup> My Settings> Preferences> Interface Settings)
- Processes Table: This table displays the results of your filter. This table lists detailed information about the process, including the process name, subject, in which step it's in, its duration in the current step, the due date and status. Processes that are grayed out are completed and those whose titles are in blue are currently active. Click the process number or subject to open the Process Details page.
- Print: This button is displayed only if there is an active process details mail merge template assigned to the selected process type. To print process details, select the check box next to the desired process and then click print for a printed copy of the process.
- Log: If a process log mail merge template is not assigned to this process, the default template is used. To print a process log, select the check box next to the desired process(es) and then click Log to generate a Microsoft Word® version of the process log. Please note that specific line items are not available in the process log. If available, the log includes merged data fields and comments.
Your e-Builder administrator can customize the process log mail merge template, if you have a need for additional fields please contact your e-Builder administrator.
Not all Process standard report subtypes are displayed on the Reports tab. Only the Process Log, Process Line Items, and Process Routing History standard report subtypes are shown here.
- Reports Tab: Click this tab to access a list of reports that have been generated for the selected process type.
- Add Report: Click this button to launch the Report Wizard and add a new report.