BIM Viewer Page
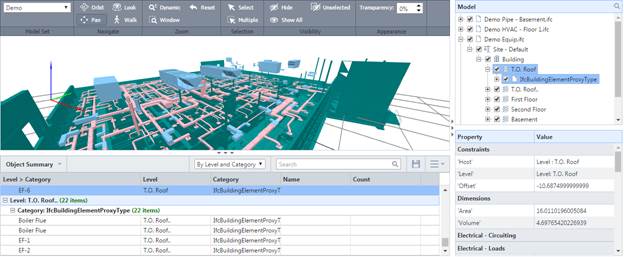
The BIM Viewer allows you to open and view the details of BIM drawings. Various tools and features enable you to interact with 3D models in very dynamic ways. You can view drawings from every angle and quickly access related information such as object properties, and their relationship and proximities to other objects. The interactive model tree allows you to view items in groups and then scale back or highlight as necessary. You can easily review saved views and locate object summaries by keyword or attributes such as category (e,g, Alarm, Control Panel, Air Terminal, etc.) or level (Basement, First Floor, etc.), for example. For instructions on getting to this page, see Access BIM Viewer.
-
Model Set Drop-Down Menu: Displays a drop-down list of available model sets. Selected models display in the Viewer. Use the addition controls in the toolbar to work with the image, for example, orbit, walk, zoom, etc.
-
Orbit: The Orbit tool moves the camera position around the center of the model space. If a model object is selected, the model object is used as the focal point to orbit around. Left click + move mouse in the direction to orbit
-
Look: The Look tool allows you to move the direction the camera is pointing from the current position. Left click + move mouse in the direction to look
-
Pan Tool: The Pan tool moves the view parallel to the screen. Left Click + move mouse in the direction to pan
-
Walk Tool: The Walk tool allows you to navigate through the model as if you were walking through it. The Walk tool movement is locked to a horizontal plane to help with orientation.
- Left Click + left/right mouse movement to turn left/right
- Left Click + up/down mouse movement to move forward/backwards
- Mouse Wheel scroll up/down to Look up/down
-
Dynamic Zoom Tool: The Zoom tool is used to control the camera zoom factor in the displayed scene.
-
Zoom Box Tool: The Zoom Box tool is used to focus the zoom level to a particular area of the model. Left Click + mouse drag to define zoom box
-
Reset: The Reset button returns the view to the default starting home camera position. The zoom level and camera orientation, but appearance and visibility settings will remain.
-
Select Tool: The Select tool is used to select model objects from the view. The Select Tool is the default behavior if no tool is selected.
- Left Click an object to select an object
- Mouse Wheel scroll up/down to zoom in/out
- Middle Click + mouse movement direction to Pan
- Shift + Middle Click + mouse movement direction to Orbit
-
Multiple Selection Tool: The Multiple Selection tool is used to select all objects in the selected area.
- Left Click + drag mouse to create the selection box
-
Hide: The Hide tool hides the select object(s) in from view.
-
Hide Unselected: The Hide Unselected tool hides all the objects in the view except for those that are selected.
-
Show All: The Show All tool restores any objects hidden by the Hide or Hide Unselected tools back to the view
-
Transparency: The Transparency tool allows you to override the transparency level for all objects in the view. The level can be adjusted by entering a number value for the percentage of transparency or using the up/down arrows to adjust
You can interact with images in the Viewer using any of the items in the Toolbar and also using a set of default mouse and keyboard controls, as described below. The default controls can be used in conjunction with any of the toolbar tools unless otherwise noted for that specific tool. If no tool is selected, the default behavior corresponds with the Select tool.
Default Controls
- Mouse Wheel scroll up/down to zoom in/out
- Middle Click + mouse movement direction to Pan
- Shift + Middle Click + mouse movement direction to Orbit
The Information pane on the right side of the interface is used to display the Model Tree and The Object properties window.
-
Model: The Model pane displays a list of all the models and model elements that are included in the selected model set. The objects are organized in a hierarchical fashion, starting from the source file with further groupings down to the individual objects.
- The search icon will allow you to find objects using a search term, such as door for example. All objects containing the term will be highlighted and in view in the Model Tree.
- To see all the doors highlighted in the model, select the entire tree.
- The check box beside the model element can be used to toggle the visibility on and off for the objects in that portion of the tree.
- Clicking on an object in the model pane also selects that object in the viewer pane.
- Right Click and choose View Object to zoom and focus on the selected object.
Click the Hide Unselected icon to see only the doors.
-
Object Properties: The Object Properties pane displays the property list for the object(s) selected in the viewer pane. The properties and the property groups displayed vary depending on the source model type and the properties it provides.
The items displayed in this pane depend on the selected option from the drop-down menu, either Saved Views or Object Summary.
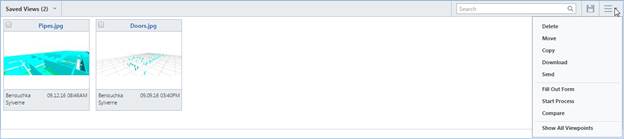
Saved Views: The Saved Views pane contains a list of viewpoints that can be browsed through or searched. By default, only viewpoints created from the current model set are displayed. The Show All Viewpoints option can be selected from the command menu to allow you to browse through all viewpoints from the project.
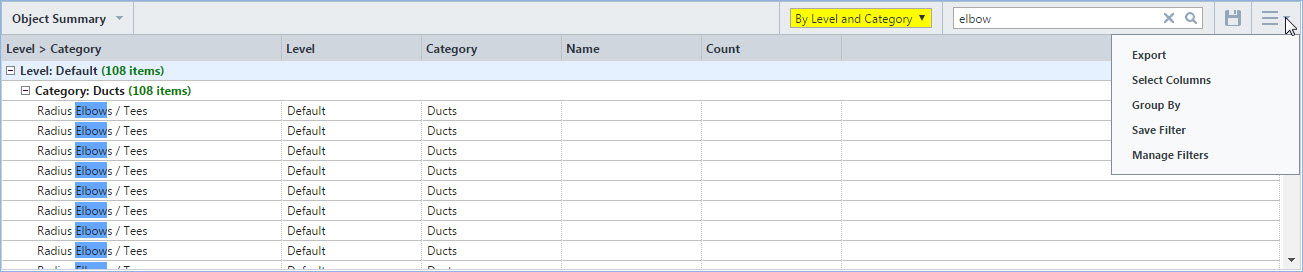
Object Summary: The Object Summary pane provides additional information on each object within the source file. The data that displays in the grid is based on a customizable selection of columns, groupings, and search criteria which are stored as filters which can be set via the Manage Filters option in the Command menu.
You can narrow the results list by utilizing the search. For even further detail, right-click an object and click View Object to zoom into the model and highlight the object in the Viewer. Furthermore, the properties of highlighted objects display in the Object Properties section of the page.
-
Filter: Object Summary: This filter is only visible on the Object Summary tab. It contains user defined sets of column, grouping and search results.
-
Search:
-
Viewpoints: Enter the term and click Enter or click the magnifying glass to execute the search. The Search utilizes the name and description of viewpoints.
-
Object Summary: The results list will update dynamically as you type the search term. The search utilizes several object details based on selected columns
-
-
Save:
-
Viewpoints & Object Summary: The Save button allows you to save a viewpoint based on the current display in the Viewer. The Save Viewpoint dialog prompts you for a viewpoint name, description, and file location to save the image to.
The Destination Folder may be preset according to BIM Settings.
-
-
Command Menu:
-
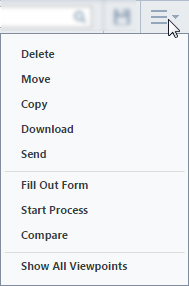
Viewpoints: The Command drop-down menu contains a list of actions that can be taken on selected viewpoints, similar to those in the Documents module (Delete, Move, Copy, Download, Send, Fill Out Form, Start Process, Compare, Show All Viewpoints).
-
Show All Viewpoints - By default, only viewpoints from the current model set are displayed. Choose this option to show viewpoints from all available model sets.
-
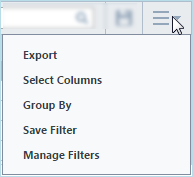
Object Summary: The Command menu contain the following options:
Users must have Manage Filters permission to access these options.
- Export: Generates an excel file from the data currently displayed in the grid. The column selection and grouping will be included. Hidden objects will not be displayed in the grid or the export.
- Select Columns: Allows you to add or remove columns to be displayed in the grid. The available columns list is derived from all the model fields that are contained in the attached models.
- Group By: Dialog is used to select the fields by which the data is grouped. Only columns that are displayed in the grid can be grouped by, so you should add any desired columns first and then use group by
- Save Filter: Saves the current state of grouping, column list, and search terms as a new filter. The user will be prompted to enter a name for the new filter.
- Manage Filters: This opens the manage filters dialog which allows you to rename, delete and set the default filter for the model set.
-
Related topics: