Bid Scope
Use the Bid Scope tab to define the scope of the bid for potential bidders. Once the scope is defined, bidders will need to provide the standard information you ask for and submit it in the format you need. This feature is most useful when there are multiple items to compare across the potential bidders. Having data in a common format simplifies this comparison process and ensures data quality and compliance standards are met.
The Bid Scope tab will be displayed only if bid tabulation has been enabled in the account setup. Contact your Trimble Unity Construct account administrator if you need access to this feature.
- From the top navigation tabs, click the Bidding tab.
Use this method if you are not already working in a project.
- On the Bidding page, choose a project from the All Projects menu.
The Bid Packages page is displayed.
- Click the name of a bid package to view the Bid Package Details page.

For bid packages that are used for pre-qualification purposes or cases where the bid manager has a specific form that bidders need to complete and submit, the Submit Quote mode may be used.
Bid managers may use the Submit Quote mode when they have a preliminary qualifications round for shortlisting the package and then a separate financial bid. If the bid manager has a very specific bid form to be downloaded and filled out, the Submit Quote mode may also be appropriate.
- In this situation, the bid manager does not set up any sections or line items on the Bid Scope tab. By not having Bid Scope line items, the package defaults to the Submit Quote mode because no financial data will be input into the Bid Response.
- On the Bid Response tab of the Bid Portal, the bidder will only see a button to upload their response document.
Only one document is allowed to be uploaded.
- If the bidder needs to submit a revised quote prior to the bid deadline, use the Submit Quote button and re-upload a new document.
The Recall Bid function is not available in this type of bid package.
- After the bid package deadline, the Bid Tabulation tab is not activated since there are no financial numbers or responses from the bidders to compare.
To simplify the process of creating a bid scope, you can import the data from a file, use a bid scope template or copy the bid scope from an existing project.
If you wish to create your own file or template, the Trimble Unity Construct field names are listed below.
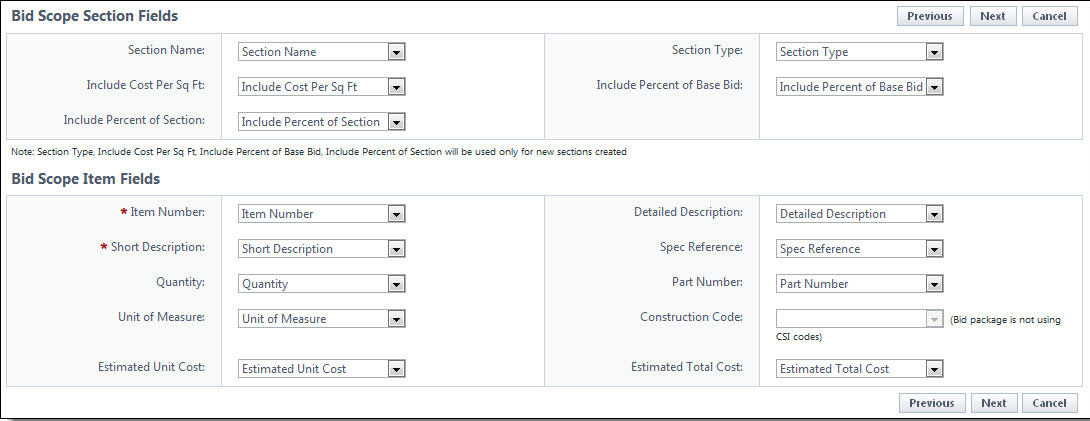
Although these are the default fields, every field does not have to be used. Custom fields can also be created to accommodate your needs. Please contact your Trimble Unity Construct Administrator if you require custom fields.
If you are not using the template, please be advised that the spreadsheet file you are importing must have a defined header row for a successful import. The first row in the spreadsheet (highlighted in red below) should have the names of the columns you want to import.
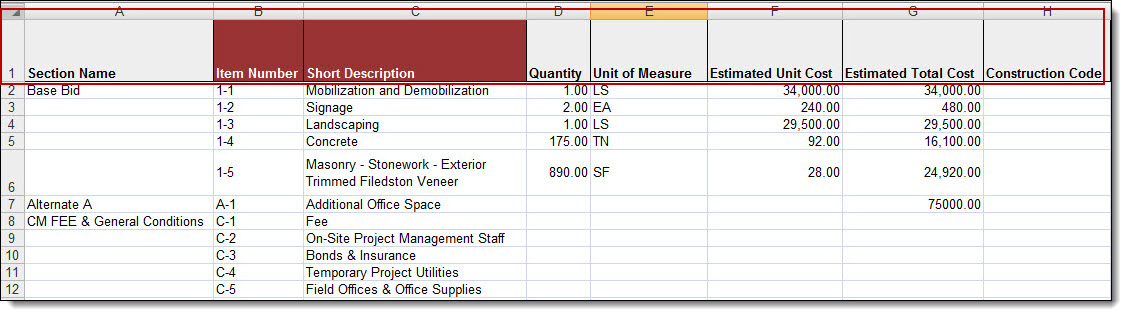
If the column headers in your import document do not match the field labels within Trimble Unity Construct, you will have to manually map each column to the associated Trimble Unity Construct field.
If your import file column headers match the Trimble Unity Construct field names, you can import your data without having to complete any field mapping. A template containing these column headers can be downloaded from Trimble Unity Construct.
- Go to the Bid Package Details page.
- Click the Bid Scope tab.
- Click Import Bid Scope.
The Import Bid Scope Items - Select Import File page is displayed. - In the Select How to Import Scope Items section, choose one of the following options:
- Add new bid items: Select this option to add the import items as new bid items.
- Add new and update existing bid items: Select this option to add new import items as well as update items that are already in the bid scope.
- Overwrite existing bid items: Select this option to use the import items to overwrite existing bid scope items.
- In the Import File field, click Choose File to search for and attach an MS Excel import file (.xls or .xlsx format).
- Click Next.
- To change any of the field mapping options, click the respective drop-down lists and make your selections.
- Click Next.
- Click Import.
- Click Finish.
Click the Download Import Template link to download a template from Trimble Unity Construct that you can use.
The Import Bid Scope Items - Field Mappings page is displayed.
The Import Bid Scope Items - Review page is displayed, allowing you to preview the fields of the bid scope.
If there are any exceptions, they are listed on the Exceptions tab. Click the Exceptions tab to review errors. Go back to the MS Excel file and make any necessary corrections, and then repeat the import procedure.
A successful import confirmation is displayed.
During export from the bid scope or viewing on imported bid scope items, the system retains higher-precision (un-rounded) values for each line item and applies rounding only at the final subtotal level. Although the displayed line-item totals match between the Import and Export files when rounded to two decimals, the underlying un-rounded values differ slightly. When these more precise values are summed, the final subtotal is mathematically more accurate but may results in a few cents difference compared to the subtotal calculated from pre-rounded line items.
In summary:
- Import: Rounding occurs per line item, then values are summed
- UI / Export: Values are summed using higher precision, then rounded
This behavior is expected in financial calculations when rounding is applied at different stages of the calculation process.
Bid scope templates are created and made available by account administrators. Instead of manually creating the bid scope, you can apply a bid scope template or copy a bid scope from an existing project.
Users with Manage Templates permissions can perform these actions.
- Go to the Bid Package Details page.
- Click the Bid Scope tab.
- Click Apply Template.
- To apply a bid scope template, select the Bid Scope Template option and then select the template from the Template drop-down menu.
- To copy the bid scope from an existing project, select the Project Bid Package option. Select the Project from the Project drop-down menu, and then select the bid package from the Bid Package drop-down menu.
- Click Apply.
The Apply Bid Scope Template dialog box is displayed.
—Or—
Additional Actions
Create sections in the bid scope to itemize and separate the different areas of the scope; such as general conditions and other fees, base bid, and alternates. This makes it easier for bidders to submit their bids and having a standard format simplifies the process of reviewing bids as well.
- Go to the Bid Package Details page.
- Click the Bid Scope tab.
- Click Create Section.
- Enter the following information and complete all necessary fields:
- Name: Enter the name of the section. This is a required field.
- Type: The Base Bid is the main section to collect the bids and is required in all bid scope definitions. Choose Alternate for all other sections. This is a required field.
- Include Cost Per SqFt: If square footage was entered in the bid details, selecting this check box will allow the system to calculate the square footage per bid scope item in the bid tabulation. If this check box is selected, you are also able to filter by square footage on the Bid Tabulation tab.
- Include Percent of Base Bid: This option is directly related to bid tabulation. Select this check box to enable the display percent of base bid total option located on the Bid Tabulation tab.
- Include Percent of Section: This option is directly related to bid tabulation. Select this check box to enable the display percent of section name option located on the Bid Tabulation tab.
- Click Save.
The Add Bid Section popup window is displayed
Items can only be added to a section after the section has been created
To make an item "unit cost", the Bid Manager has to provide the details in the Quantity and the Unit of Measure (UoM) fields. The bidder then submits a "unit rate" against that quantity. If the Bid Manager fills in the Estimate/ Unit Cost field details on a unit cost item, that rate is saved for reference and only the Bid Manager will be able to see it. This is useful for later comparison on the Bid tab. If the Bid Manager fills in the Estimate/ Unit Cost field details on a lump sum item, that amount is saved for the Bid Manager's reference as well.
- Go to the Bid Package Details page.
- Click the Bid Scope tab.
- Click Add Item located in the respective section.
The Add Bid Item popup window is displayed. - Complete all required fields (marked with an *):
- Bid Section: The bid scope section that the item is created in. This field is not editable.
- Item Number*: Enter or select the item number in this field.
- Short Description*: Enter a description for the bid item.
- Spec Reference: Enter the specification reference number for the item.
- Part Number: Enter the part number for the item.
- Quantity: Enter a quantity for the item.
- UoM: Select a unit of measure from the drop-down list for the quantity entered.
When entering the quantity, the unit of measurement is a required field.
- Estimate/ Unit Cost: Enter an estimate of the cost per unit of the item. If a non-zero quantity is entered, this amount is the estimated unit cost else it is the total estimate and no unit cost information will be saved.
- Budget Line Item: Select a budget line item. This field is displayed only when "Bid Award to Commitment" is turned on under Bid Options.
- Construction Code: Select the construction code for the item from the drop-down list. This field is displayed only when construction codes are managed.
- Details: Enter a description of the item and provide more details about it.
- Click Save. The popup window remains open, allowing you to add additional line items by repeating the previous steps.
- When you are done adding items, click Cancel to close the popup window.
Formulas can be created to add different sections together so that you can look at the bid submissions in different ways.
For example, base bid + alternate 1, or base bid + alternate 1 and alternate 2.
These formula results are not shown to the bidders, only to the bid manager when the bid tabulation is opened.
- Go to the Bid Package Details page.
- Click the Bid Scope tab.
- Toward the bottom of the page, click Add Formula.
- Enter the name of the formula in the Name field.
- Select the check box next to the section(s) you want to include in your formula.
- Click Save.
The Add formula dialog is displayed.
The totals are displayed at the bottom of the page, in the Bid Summary section.
The bid scope can be exported to an MS Excel spreadsheet enabling you to share pertinent bid scope estimations with others who may not have access to Trimble Unity Construct Enterprise or the Bidding module.
- Go to the Bid Package Details page.
- Click the Bid Scope tab.
- Click the export to Excel icon (
 ).
).
The MS Excel spreadsheet is downloaded.
The Additional Information feature allows you to capture and track pertinent data about potential bidders to help you make the best and most informed decision. You can choose to add questions that you require potential bidders to answer, include relevant data that potential bidders cannot see, use the data for bid tabulation, or all of the above.
Individual additional information records can be added one at a time or you can add records that have been used in different projects.
- Go to the Bid Package Details page.
- Click the Bid Scope tab.
- Click the Additional Information tab.
- In the Prompt/Question field, enter the prompt or question.
- Select all check boxes that apply:
- Bidder Entry: Select this check box to allow the prompt/question to be visible for bidders to fill out.
- Required: Select this check box to make the prompt/question a required field for bidders to complete. If you select this check box, the Bidder Entry check box will also be selected by default.
- Include in Bid Tabulation: Select this check box to include the prompt/question in the bid tabulation. This facilitates comparing bidders based on the additional information entered.
- Click Save.
- Go to the Bid Package Details page.
- Click the Additional Information tab.
- To include records used in a particular project, click Add From Project.
- From the Project drop-down list, select the project from which the additional information records will be copied.
- Select a bid package from the list of project results.
- Select the check box next to the question/ prompt you want to add.
- Click Add.
- Click Close to return to the Additional Information tab.
The Add Additional Information window is displayed.
When there is a change to the bid scope, adding an addendum is a fast and easy way to get the information to all parties at once. Bidders receive an email notification when an addendum is issued. When they log into the portal, they can review the text of the addendum under the Package Invitation/ Addenda tab. Prior to submitting a response, the bidder is required to acknowledge every issued addendum with a check box on the STEP 3: Additional Required Info tab.
An addendum can only be added after an invitation to bid has been sent out but new addenda cannot be added after the bid tabulations has been opened. Addenda notifications are sent out to all invited bidders, irrespective of whether they have responded to the invitation to bid or not. If the bidder already submitted their bid after the addendum was issued, the bidder will receive notification requiring them to resubmit their bid and acknowledge the addendum.
The addendum is text-only. If new documents are issued as a result of the addendum, add a new folder inside the designated Bid Documents folder as a best practice. The bidders will see this folder on the portal in the Invitation Documents tab.
- Go to the Bid Package Details page.
- Click the Bid Scope tab.
- Click the Addenda tab.
- Click Add Addendum.
- Enter the following information:
- Addendum Number: Enter a number for the addendum.
- Description: Enter a description for the addendum.
- Details: Enter the details of the addendum. This is optional.
- Documentation Available Date: Enter or select the date and time at which the details of the addendum will be available for bidders to view. This is optional.
- Click Save.
The Add Addendum for Bid Package popup window is displayed.
Available on the Bid Scope page
- Project: Displays the project name.
- Bid Package: Displays the name of the bid package.
- Project Number: If available, the project number is displayed in this field. Project numbers allow you to have a unique identifier for each of your projects. Account administrators can add project numbers by going to Administration Tools > Projects > Project Settings > Choose a custom field option from the Project Number Custom Field drop-down menu.
- Status: Displays whether the bid package is open or has been closed.
The following tabs are available on the Bid Scope page:
- Create Section: Click to create the different sections of the bid scope. Creating sections helps you itemize the bid scope, clearly separating the different areas of scope; such as general conditions and other fees, base bid, and alternates. This makes it easier for bidders to submit their bids and having a standard format simplifies the process of reviewing bids as well.
This button is only available prior to sending out the invitation to bid. Once the invitation has been sent this button will disappear. To make changes after this point, you will have to create an addenda. - Add Item: One of these buttons is displayed for all sections that have been created. Click to add the details of the individual items that contractors will bid on.
This button is only available prior to sending out the invitation to bid. Once the invitation has been sent this button will disappear. To make changes after this point, you will have to create an addenda. - Base Bid: The Base Bid is completed by bid managers when creating the sections of the bid scope. This is the only required section of the bid scope. When the quantities and prices to complete the project have been estimated, the bid manager uploads these figures to use as a comparison when potential bidders begin to submit their figures.
- Add Formula: Click to add formulas, which allows you to add different sections of the bid scope together so that you can look at the bid submissions in different ways. For example, base bid + alternate 1, or base bid + alternate 1 and alternate 2. These formula results are not shown to the bidders, only to the bid manager when the bid tabulation is opened.
- Bid Summary: This section of the bid scope will auto-populate a summary of the totals in all previous sections of the bid scope.
The additional information tab allows you to capture and track pertinent data about potential bidders to help you make the best and most informed decision. You are able to choose which of the sets of information is visible to potential bidders and which will be hidden from their view. You can choose to add questions that you require potential bidders to answer, include relevant data that potential bidders cannot see, use the data for bid tabulation, or all of the above.
- Add From Project: Click to pull in questions/ responses from another package on any project to avoid having to re-enter the same information with every bid package.
- Question/ Prompt: Displays after additional information has been added. This column lists the questions or additional information that you're tracking or want potential bidders to complete.
- Bidder Entry: Displays after additional information has been added. A check mark in this column indicates that the question/ prompt is visible to potential bidders.
- Required: Displays after additional information has been added. A check mark in this column indicates that the question/ prompt is a required field for potential bidders to complete.
- Include in Bid Tabulation: Displays after additional information has been added. A check mark in this column indicates that the question/ prompt will be included in the bid tabulation.
- Add Additional Information: Use this section to quickly add additional information records.
- Prompt/ Question: Enter the questions or prompt in this field.
- Bidder Entry: Select this check box to allow the prompt/ question to be visible for bidders to fill out.
- Required: Select this check box to make the prompt/ question a required field for bidder to fill out.
- Include in Bid Tabulation: Select this check box to include the prompt/ question in the bid tabulation. This facilitates comparing bidders based on additional information.
- Save: Click to save the new additional information record.
When there is a change to the bid scope, adding an addendum is a fast and easy way to get the information to all parties at once. When bidders log into the bidder portal, they will be able to view and acknowledge that they have seen all addenda items.
An addendum can only be added after an invitation to bid has been sent out, but new addenda cannot be added after the bid tabulation has been opened.
-
Add Addendum: Click to add an addendum. This button will only be visible after an invitation to bid has been sent out, and before the bid tabulation has been opened.
-
Addendum Number: Each time an addendum is added, you must assign a number to it. That number displays in this column.
-
Description: Displays the description of the addendum.
-
Date Created: Displays the date the addendum was created.
-
Documentation Available Date: Displays the date that the details of the addendum will be available for bidders to view.
Related Topics: