About Account Views
You can create views for all members on the account or for specific roles. As many views as necessary can be created. The views that you create for your team members will be available from the views drop-down menu on the main page of each module that they have access to.
You might create a view for project managers that are responsible for approving design documents for a set of construction projects located in the west region of your company's territory. You could create a view in the Documents module that shows all necessary data for all projects located in the west region. This would ensure that when project managers access the Documents module they would see the necessary data for all applicable projects.
You can access and create account views from the Manage Views page under Setup.
An account view that was created by an Administrator cannot be edited by non-admin users. Account views cannot be deleted by non-admin users since they are created by an administrator and made available to all account users.
- From the top navigation tabs, click the Setup tab.
- Click Views to expand it.
- Click the module name. The Manage Views page is displayed listing all the views available for the selected module.
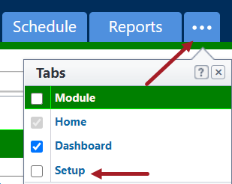
If the Setup tab is not visible, click ![]() , and then select the Setup check box.
, and then select the Setup check box.
The Administration Tools section is displayed on the left pane.
Available on the Manage Views page
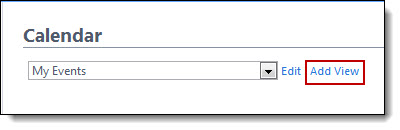
- Add View: Click to create a new account view.
- Edit: Click to modify the details of the view (for personal views). Account level views cannot be edited by non-admin users.
- Copy: Click to copy the view. Creating a new view from a previous one is a quick and easy way to save a new view without having to start from scratch.
- Delete: Click to delete the view. You will be asked to confirm whether you wish to delete the view. Once a view is deleted, it cannot be recovered.
- View Name: Displays the name of the view.
- Permissions: Displays the access permissions of users for the view. You can choose to make a view available to all users or only users belonging to selected user roles.
In Trimble Unity Construct, administrators can create custom views for all users or only users belonging to selected user roles.
The Access Criteria section will be displayed only for Administrators while they create account level views.
- From the top navigation tabs, click the Setup tab.
- Click Views to expand it.
- Click the module name. The Manage Views page is displayed listing all the views available for the selected module.
- Click Add View.
- Enter the name of the view in the Name field.
- Use the Search Criteria section, to specify the criteria for this view.
- Click the Search Rule #1 drop-down arrow and select an event or project detail by which to choose the first criteria of this custom view.
- Click the second column drop-down arrow to select a qualifier.
- In the third column, enter the qualifying value. If available, you can also click the Lookup button to select from a list of options.
-
Days "d" to weeks "w" when the number of days equals or exceeds 21d and is less than 181d.
-
Days "d" to months "mo" if the number of days exceeds 182d and is less than 361d.
-
Weeks "w" to months "mo" if the number of weeks exceeds 26w.
-
Days "d" to years "y" if the number of days exceeds 360d
-
Weeks "w" to years "y" if the number of weeks exceeds 51w
-
Months "mo" to years "y" if the number of months exceeds 12mo
- (Not available for the Calendar views) On the Columns Displayed (numbered left to right) section, select the columns from the drop-down list. These will be grouped from left to right.
- (Not available for the Calendar views) On the Sort View section, choose to either sort the selected column in an Ascending or Descending order.
- In the Access Criteria section, select either of the following options:
The Access Criteria section will be displayed only for Administrators while they create account level views.
- All Users: Select this option to make the view available to all users.
- Selected Roles: Select this option to make the view available only to users in the selected roles. Specify the roles that have access by selecting them from the All Roles list box and using the right arrow button to move them to the Roles With Access list box.
- Click Save.
If the Setup tab is not visible, click ![]() , and then select the Setup check box.
, and then select the Setup check box.
The Administration Tools section is displayed on the left pane.
The Add View page is displayed.
Options in the Search Criteria section will differ for each module.

For search criteria that include duration, enter any integer immediately followed by a lowercase "d" (no space). After saving, the system will covert:
Related Topics: