Specify Filter Criteria
You can specify filter criteria for the report in the last step of the Report Wizard.
Step 7 of the Report Wizard allows you to customize what filtered data should be displayed within this particular report. You can zoom into really specific data filters that will expose certain values without having to search through the product. Or you can limit your filtering, in which case, more data will be returned based on what data was selected to be included in the report, specified in other steps of the wizard.
This is step 6 when using a Tabular report, and step 7 when using a Summary or Matrix report.
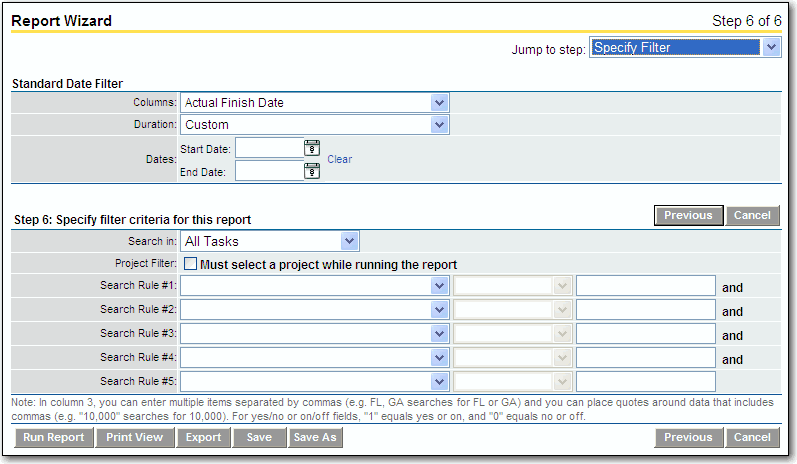
In this section, there is a drop-down for selecting the date fields available for just this report type (a subset of the fields in the full filter below). When the dates are entered, then only data that falls within that date range, for the selected column, will appear in the report.
The Duration drop-down includes a Custom selection, along with other selections for Fiscal Year, Fiscal Quarter, Calendar Year, Calendar Quarter, Month, and Weekday. When an option is chosen, the user is shown what the corresponding dates would be as of the current moment. Custom is the default (no start or end date are populated).
These standard filter values are saved with the report's definition.

To specify the standard date filter
- From the Columns drop down list, select the date column you wish to filter the report by.
- From the Duration drop down list, select a time duration for the report. The Dates fields are automatically populated with the corresponding dates, as of the current moment.
The Duration drop-down includes a Custom option, along with other options for Fiscal Year, Fiscal Quarter, Calendar Year, Calendar Quarter, Month, and Weekday. The default selection for this field is the Custom option (no start or end dates are populated). The selection in this field will omit data that doesn't match this date duration filter within the column specified above.
- In the Dates field, click the date picker and select dates from the Start Date and End Date date pickers to change the automatically populated dates.
To remove the selection, click the Clear hyperlink. The Start and End Date fields will be cleared.
The Specify Filter step allows you to create and use up to five search rules in your report. With these search rules, the results of the report can be limited to show only a specific sub-set of the data that you have access to. For example, this is useful in cases where it is not necessary to include all projects on a report. Additionally, you are also able to use the same single project report for any project.
To limit the report results to only one project, select the Must select a project while running the report check box in the filter criteria section. If this check box is selected, you will be prompted to select a project each time the report is run.
To create search rules
- Select the field name to use for the filter from the first drop down list beside Search Rule #1. The second drop down list is enabled.
The options available in this field are based on the type of data included in the report.
- From the second drop down list beside Search Rule #1, select the modifier condition of the filter.
 Tip
TipIf you select a date field in the previous step, then there will be more options in this drop down list.
- In the last field, enter the desired value for use in the filter.
 Tip
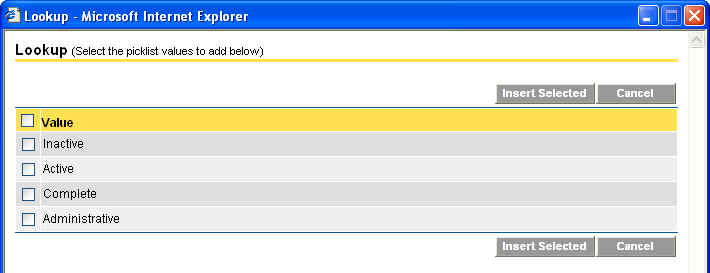
Tip- For some fields, a Lookup button is available. The lookup button will prompt you to select from the options that are available as filters for the selected field. Click Lookup and a new window displays with options that can be selected. Select the check box(es) next to the appropriate selections and click the Insert Selected button to add the option(s) to the report. The Lookup window will then close and the specify filter page will reflect the selections that you have made.

- You can enter specific values so that data outside of those values do not appear in your report. You can enter multiple items separated by commas. For example, FL, GA searches for FL or GA. You can place quotes around data that includes commas. For example, "10,000" searches for 10,000. For yes/ no or on/ off fields, "1" equals yes or one and "0" equals no or off.
- For some fields, a Lookup button is available. The lookup button will prompt you to select from the options that are available as filters for the selected field. Click Lookup and a new window displays with options that can be selected. Select the check box(es) next to the appropriate selections and click the Insert Selected button to add the option(s) to the report. The Lookup window will then close and the specify filter page will reflect the selections that you have made.
- Repeat the previous steps to define the other four search rules.
The more search rules entered, the more zoomed in/ filtered the report data will become.
- Click Save As to save the report.
- Click Run Report to display the results of the report.