Report subscriptions can be managed from this page at any time. Subscription management allows you to add, delete or change scheduling details.
Sometimes subscription reports would fail to execute due to configuration problems such as changed report permissions, invalid destination folders or due to invalid users. The report would continue to retry on each subscription period indefinitely and continue to fail consistently. To avoid this, e-Builder sets a limit on the number of retries made. Report subscriptions will retry immediately five times, and then for four more scheduled periods. If the report continues to fail, it will be marked disabled after the fifth scheduled attempt. An email notification will be sent to the subscribed user and administrators informing them that the subscription has been disabled.
Dates and Times
Dates and times shown in scheduled reports are converted to the time zone of the user who created the scheduled report. This can make dates look incorrect if the scheduled report's time zone is different from the receiving user's time zone.
Use the Subscriptions - Reports page to view all the scheduled reports you are subscribed to.
To access subscription reports
- From the top navigation tabs, click the Setup tab.
- Click Subscriptions to expand it and then click Reports.
The Subscriptions - Reports page is displayed.
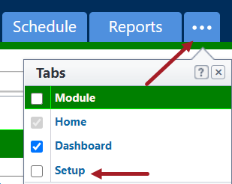
If the Setup tab is not visible, click ![]() , and then select the Setup check box.
, and then select the Setup check box.
The My Settings section is displayed on the left pane.
- Add Scheduled Report: Click to add a scheduled report, which will allow you to receive existing reports on a scheduled basis. These subscriptions can be added by any licensed e-Builder user at any time.
- Edit: Click to modify the details of the subscription, such as the report type, subscription name, delivery method and frequency.
- Delete: Click to delete the report subscription. This will remove the subscription for the account all together.
- Disable: Click to disable the report subscription. Disabling allows you to temporarily suspend the subscription without removing it from the account all together.
- Run Now: Click to run the report and receive real time data.
- Name: Displays the name of the name of the subscription. Click the name to directly view the report in e-Builder.
- Output Type: Displays the output type. To make changes, go to step 1 of 4 of the Edit Scheduled Report wizard.
Options include:- HTML: This output type formats data in HTML - the standard formatting language used to create websites
- Excel Data Export: This output type allows you to view and modify data in an Excel spreadsheet.
- Excel Print View: This output type is a read-only Excel spreadsheet that cannot be modified.
- CSV Data Export: This output type displays data in a table-structured, comma separated format.
- Tab Delimited Text: This output type separates data using the tab character. This format supports exchanging and storing information in databases.
- Schedule: Displays the days and time the report is scheduled to run.
- Next Run Time: Displays the next time day and time the report is scheduled to run.
- Last Run Time: Displays the last date and time the report is scheduled to run.
- Last Result Status: Displays the status of the last report. Scheduled reports can either succeed or fail.
- Delivery Type: Displays the delivery method set for this scheduled report. To make changes, go to step 4 of 4 of the Edit Scheduled Report wizard.
More than one of following options may be selected:- Email - Select to receive your email subscriptions via email. Additional options allow you to:
- Opt out of receiving empty reports
- Choose others to copy on the subscription
- Add email addresses of people you wish to unsubscribe. If someone unsubscribes that you subscribed, their name will be listed in the Unsubscribed Addresses box.
- e-Builder Document Folder - Select to have your subscription sent to an e-Builder Documents folder. Additional options allow you to:
- Choose a destination folder
- Receive an email confirmation so you're alerted when the report is delivered
- Opt out of receiving empty reports
- FTP - Select to have subscriptions sent over an FTP (File Transfer Protocol) server. Additional options allow you to:
- Enter the server address, port, user name password and directory
- Use SSL
- Receive an email confirmation so you're alerted when the report is delivered
- Opt out of receiving empty reports
- Secure File Transfer (SSH) - Select to have your subscription sent via SSH. Additional options allow you to:
- Enter the server address, port, user name password and directory
- Receive an email confirmation so you're alerted when the report is delivered
- Opt out of receiving empty reports
Personal report subscriptions allow you to receive existing reports on a scheduled basis. These subscriptions can be added by any licensed e-Builder user at any time.
When adding scheduled reports, you will work through a four-step configuration wizard that allows you to set up the details of your subscription.
- Go to My Settings.
- Click Subscriptions, and then Reports.
The Subscriptions - Reports page is displayed. - Click Add Scheduled Reports.
- Complete all the required fields on each step of the Schedule Report Wizard.
Refer to the list of fields and buttons below for more information on each step of the Schedule Report Wizard. - Click Next to advance to the next step of the wizard.
- Click Save.
The Add Schedule Report page of the Schedule Report Wizard (Step 1 of 4) is displayed.
Fields and buttons available on the Schedule Report Wizard pages
Required fields are marked with an *.
- Select a report to schedule*: Click the drop-down arrow to select an existing report to create the subscription for.
- Select field to record the date for the following events: The drop-down menu options are populated with either date-type custom fields or process/ form data fields depending upon the type of report selected to be scheduled. They allow you to include a start and completed time stamp for the scheduled report. / When the scheduled report starts processing, the first field is updated with the current system time stamp on every entity that is included in the report results. The second field gets populated with the current time stamp after the report is successfully delivered to its configured destination (email/ folder/ FTP).
- Select an output type: HTML is the default file output type, but you can choose from any of the following options:
- HTML: This output type formats data in HTML - the standard formatting language used to create websites
- Excel Data Export: This output type allows you to modified data in an Excel spreadsheet.
- Excel Print View: This output type is an Excel spreadsheet that cannot be modified.
- CSV Data Export: This output type displays data in a table-structured, comma separated format.
- Tab Delimited Text: This output type separates data using the tab character. This format supports exchanging and storing information in databases.
-
Select a name for this schedule*: By default the report name appears in this field, but you can choose to rename the subscription to something more meaningful.
-
Run report: Select the interval for which to run and send this report. Choose from the following options:
- Daily
- Weekly
- Monthly
- One Time
The options that are available on this page are determined by the interval you selected to receive your subscription in the previous step. For example, if you choose a one-time subscription, only the option to select a date and time will appear, without the option to choose days of the week.
-
Select the date and time you want to receive this report*: The present day is defaulted in this field. Click the calendar icon to choose a different day to receive the first subscription. Also, if you have a time preference, make the selection here.
-
Email this report each: Select the days of the week you wish to receive the report.
Select a delivery type: Select one or more delivery types for your scheduled report subscription. Choose from the following:
- Email: Select to receive your email subscriptions via email. Additional options allow you to:
- Opt out of receiving empty reports
- Choose others to copy on the subscription
- Add email addresses of people you wish to unsubscribe. Add email addresses of people you wish to unsubscribe. If someone unsubscribes that you subscribed, their name will be listed in the Unsubscribed Addresses box.
- e-Builder Document Folder: Select to have your subscription sent to an e-Builder Documents folder. Additional options allow you to:
- Choose a destination folder
- Receive an email confirmation so you're alerted when the report is delivered
- Opt out of receiving empty reports
- FTP: Select to have subscriptions sent over an FTP (File Transfer Protocol) server. Additional options allow you to:
- Enter the server address, port, user name password and directory
- Use SSL
- Receive an email confirmation so you're alerted when the report is delivered
- Opt out of receiving empty reports
- Secure File Transfer (SSH): Select to have your subscription sent via SSH. Additional options allow you to:
- Enter the server address, port, user name password and directory
- Receive an email confirmation so you're alerted when the report is delivered
- Opt out of receiving empty reports
Report subscriptions can be modified to change various details, such as the report you're subscribed to, the format of your notices, the frequency at which you're notified and many other details.
When editing scheduled reports, you will work through a four-step configuration wizard that allows you to set up the details of your subscription.
- Go to My Settings.
- Click Subscriptions, and then Reports.
- Click the Edit link next to the subscription you want to edit.
- This page allows you to change the report and output type. To change additional details, click Next. Step 2 of 4 is displayed.
- This page allows you to change the standard name of the output file, the name of the schedule and the frequency at which to run the report. To change additional details, click Next. Step 3 of 4 is displayed.
- This page allows you to change the days of the week, and time you'd like to receive this report. To change additional details, click Next. Step 4 of 4 is displayed.
- This page allows you to change the delivery method and copied users that will receive this report.
- Click Save.
The Subscriptions - Reports page is displayed.
The Edit Schedule Report page (Step 1 of 4) is displayed.
Related Topics