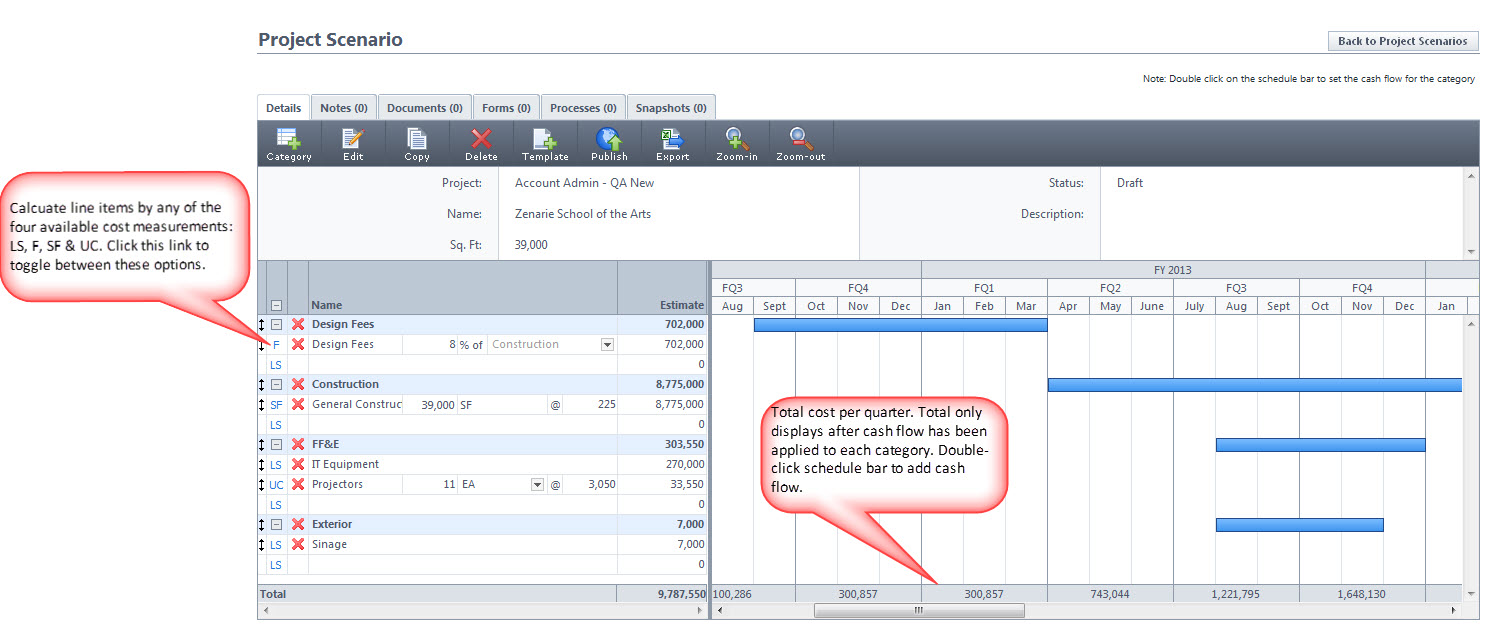
- LS = Lump Sum: Enter the lump sum of the item in the Estimate field.
- UC = Unitized Cost: Enter the quantity of the item then click the drop-own list to select a unit of measure. In the last field, enter the cost per unit.
- SF = Square Feet: The square footage must first be defined in the project scenario details in order to enter items by square feet. If the square feet are not already added to the scenario details, click Edit to include it.
- F = Formula: This cost measurement allows you to enter cost based on a percentage of another category item. Thus, the category you want to base your formula on must first be created before using this cost measurement.
- Details Tab: When you access the project scenario page, the Details tab displays by default. This tab allows you to see and edit all the details of the project scenario.
- Notes Tab: Click to view or add notes to the scenario.
- Documents Tab: Click to view or add documents to the scenario. An example is a written estimate from one or more vendors to help drive the final budget, schedule, and cash flow components.
- Forms Tab: Click to attach forms or view forms that have been attached to the scenario. If enabled, you can also fill out forms directly from this tab. For instance, a capital authorization request can be attached, which is a record of the approved funds for the scenario. The planner might ask a contractor early on to give a preliminary estimate and that estimate can be attached as a reference.
- Processes Tab: Click to attach processes or view processes that have been attached to the scenario.
- Snapshots Tab: Click to view snapshots of the scenario. A snapshot is automatically taken when a published scenario is edited. This creates a version history for every edit that is made.
- Back to Project Scenarios
 : Click this button to leave the Project Scenario page and return to the list of project scenarios.
 - Add new category
 : Click to add a new category. Categories are phases of the project for which you need to plan for.
 - Edit
 : Click to edit the name and/or description of the scenario. You can also alter the square footage of the property.
 - Create template
 : Click to create another scenario using the current scenario as a template.
 - Delete
 : Click to delete the scenario.
 - Apply a template
 : Click to apply a preexisting scenario template. To create scenario templates, please see your e-Builder Administrator.
You can apply more than one template freely at any time. Keep in mind that if the same categories exist in the plan and in the template, but line items are different, only the different line items will be added.
- Publish
 : Click to publish the scenario. Publishing scenarios makes them available for inclusion into the capital plan. If you edit a published scenario, a snapshot will automatically be created on the previously published version and can be referenced later on.
 - Export to Excel
 : Click to export the scenario to a Microsoft Excel® spreadsheet.
 - Zoom in or Zoom Out
 or
or  : Click to adjust the zoom. Zooming-in allows you to see a monthly view of the calendar. Zooming midway provides a quarterly view and when fully expanded, you can see a yearly view of the calendar.
Related Topics: