Project Role Templates
Project Role Templates give account administrators a way to predefine the roles that will be applied to specific project types. For example, Jane Doe may be the lead on all Campus projects, but John Doe is the lead on all Medical Center projects. Using project level role templates is a quick and easy way to apply project roles across your different project types.
- From the top navigation tabs, click the Setup tab or from the Utility menu by clicking the drop-down arrow next to your user name.
- In the Administration Tools section, click Users.
- Click Project Role Templates.
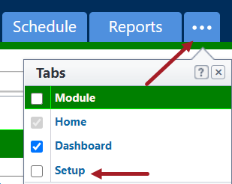
If the Setup tab is not visible, click ![]() , and then select the Setup check box.
, and then select the Setup check box.
The recommended way to create project role templates is to first create the template using an Excel® spreadsheet (a template is available, see Download Project Role Template for instructions.) and then import it into e-Builder Enterprise. However, a template can also be created within e-Builder Enterprise.
To add a project role templates within the system
- Go to the Project Role Templates page.
- Click Add.
- Complete all required fields.
- In the Setup section, click the Role drop-down menu and select a role.
- Select the user to add to this role template and click the right arrow.
- Click Save.
Members of this role are displayed in the Unselected Users section.
The selected user is added to the Selected Users box.
The recommended way to edit project role templates is to modify the Excel® template and import it into e-Builder Enterprise™. This makes saved templates easily accessible from your local machine. For instructions, see Download Project Role Templates and Import Project Role Templates.
However, you can also edit a template within e-Builder Enterprise™:
To edit project templates within e-Builder Enterprise™
- Go to the Project Role Templates page.
- Click the Edit link next to the template you want to edit.
- To remove users from the template, in the Setup section, select the users from the Selected Users box and click the left directional to add them to the Unselected Users box.
- To add users to the template, in the Setup section, click the Role drop-down menu and select a role. Members of this role display in the Unselected Users section.
- Select the user(s) to add to this role template and click the right directional arrow. Selected users are added to the Selected Users box.
- To continue adding users from different roles, repeat steps 5 and 6 for all of the roles you want to add to the template.
- Click Save.
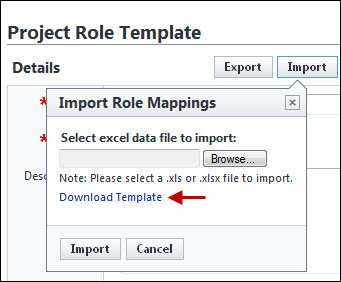
This is a preliminary step for importing project role templates. The template is an Excel® spreadsheet with two columns: Role Name and User Name. Fill in the columns for each respective project, save the file and then import it for use on the project.
To download project role templates
- Go to the Project Role Templates page.
- Click Add.
- Click Import.
- On the Import Role Mappings dialog box, click the Download Template link.
To import project role templates
- Go to the Project Role Templates page.
- Click Add.
- Complete all necessary fields.
- Click Import.
- On the Import Role Mappings dialog box, click the Browse button.
- Navigate to and select the project role template.
- Click Import.
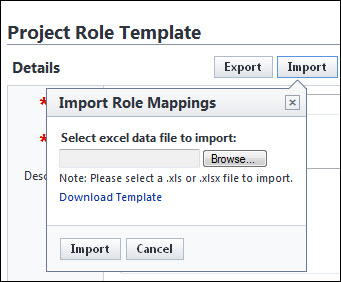
A success message displays, confirming the import and informing you to go back and save the record.
The printing option has two views; the print view and data export view. The print view is used for reporting and general knowledge. It cannot be used to reimport the template. The data export view, however can be imported into the system.
To export a project role template
- Go to the Project Role Templates page.
- Click the title of the template you want to export.
- Click Export.
- To print the template, select the Print View radio button.
- Click Export.
The Select Output Type dialog box is displayed.
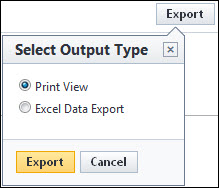
—Or—
To export the file, click the Excel Data Export radio button.