The submittal register is typically imported into e-Builder by the general contractor (with Add/ Edit Submittals permission) at the start of the submittal process. Imports can also be performed by subcontractors with the Create Submittal permission.
While submittal items can be added one at a time, the Excel file Import function allows you to save time by importing items in bulk. The import file can include as much or as little detail about the submittal items as necessary. If available, custom fields can also be imported.
- Supported import file types include .xls and .xlsx.
- Header row values in the import file:
- The import file must have a defined header row for a successful import (highlighted in the image below).

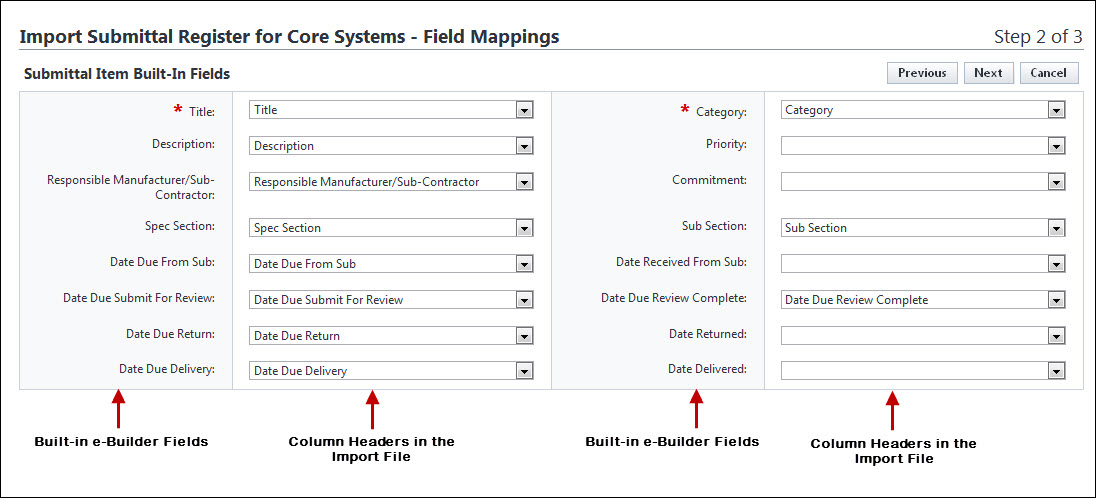
- If the header row in the import file is identical to the e-Builder field names, these fields will be automatically populated, otherwise, you will have to click the drop-down arrows to map the columns in the import file to those in e-Builder.
 Example
The following image is of the Field Mappings page that is displayed after the file is uploaded. The left column lists the built-in e-Builder fields. The right column (with the drop-down menus) are the column names of the imported Excel spreadsheet. If the header row in the import file is identical to the e-Builder field names, these fields will be automatically populated, otherwise, you will have to click the drop-down arrows to map the columns in the import file to those in e-Builder.
- The import file must have a defined header row for a successful import (highlighted in the image below).
To import the submittal register
- Go to the Submittal Register page. For access instructions, see Access Submittals.
- Click Import.
- Click Choose File to search for and select the import file.
- Click Next. The Field Mapping page is displayed showing the mapping between your Microsoft Excel® columns and the e-Builder fields.
- If the columns in your file are the same as the columns in e-Builder, they will populate automatically. If not, select the corresponding fields from the adjacent drop-down menus.
- Click Next. The Review page is displayed showing a preview of the import and any exceptions determined.
- If there were errors, review them on the Exceptions tab, make necessary changes, and then click Previous to re-import the spreadsheet. Repeat this procedure from step 3.
—Or—
If all rows have imported correctly, click Import. A import confirmation notification is displayed. - Click Finish.

Related Topics:
