About Managing Users
A person's ability to perform tasks is based on their permissions. Although you can technically grant permissions to individual users, as a best practice, permissions should be managed by account or project role roles; i.e. Project Managers, Accountants, General Contractors, Consultants,.. Roles are defined by account administrators, and should represent the actual roles that exist throughout your organization. As people join, leave and change positions throughout your organization, maintaining their level of access is easiest if managed by account or project roles. Managing permissions in this manner streamlines auditing and permission management.
The following concepts are used within Trimble Unity Construct:
-
Account roles: Highest level at which permissions are granted. They should be created for every role that will be used throughout all of your projects. Members of an account role will have the permissions of that role on every account that they have access to.
-
Project-level roles: Allow you to diversify the permissions of a role from project to project. To learn more, see Account Role Management.
To access the Users Settings
- From the top navigation tabs, click the Setup tab or from the Utility menu by clicking the drop-down arrow next to your user name.
- In the Administration Tools section, click Users.
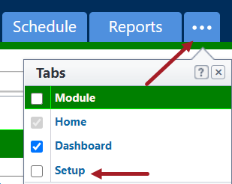
If the Setup tab is not visible, click ![]() , and then select the Setup check box.
, and then select the Setup check box.